「なぜ私のふくらはぎは、太くて位置が低いんだろう…」
「夕方になると足がパンパンにむくんで、靴がきつくなる…」
「モデルさんのような、キュッと引き締まった足首と、高い位置にあるふくらはぎに憧れる…」
大阪梅田のパーソナル加圧トレーニング&丹田スタジオHearts227で、日々多くのお客様のお悩みに向き合っていると、このようなお声を非常に多く伺います。こんにちは、パーソナルトレーナーの戸村能久です。
多くの方が、ふくらはぎの悩みは「生まれつきの骨格や体質のせい」だと諦めてしまっているかもしれません。しかし、断言します。ふくらはぎの形と位置は、正しい知識に基づいたトレーニングと生活習慣で、見違えるほど変えることが可能です。
この記事では、私がトレーナーとして長年培ってきた経験と、身体のメカニズムに関する専門知識を基に、あなたのふくらはぎを「自分史上最高」の状態へと導くための具体的な方法を、余すことなくお伝えします。小手先のテクニックではありません。あなたの脚の悩みの根本原因にアプローチし、本質的な変化を促すための、いわば「脚の取扱説明書」です。
この記事を最後まで読めば、あなたは以下のことを手に入れることができます。
- なぜ自分のふくらはぎが太く見え、位置が低くなってしまうのか、その本当の原因
- 理想的なふくらはぎの形を作るために、どの筋肉をどう鍛えれば良いのかという明確な答え
- 明日からすぐに実践できる、プロが教える効果的なエクササイズ「カーフレイズ」の正しいフォーム
- トレーニング効果を最大化し、つらいむくみを根本から解消するための生活習慣
もう一人で悩む必要はありません。私と一緒に、自信に満ちた美しい脚への第一歩を踏み出しましょう。
なぜあなたのふくらはぎは”理想の形”から遠ざかるのか?3つの根本原因
多くの人が悩むふくらはぎの形。その原因は一つではなく、複数の要因が複雑に絡み合っています。まずは敵を知ることから始めましょう。あなたの脚の悩みを引き起こしている根本原因を、プロの視点から徹底的に解剖します。
原因1:筋肉のアンバランス – “腓腹筋”と”ヒラメ筋”の不協和音
ふくらはぎの形を決定づける主役は、**「腓腹筋(ひふくきん)」と「ヒラメ筋」**という2つの筋肉です。
- 腓腹筋(ひふくきん): ふくらはぎの一番表層にある、力こぶを作る筋肉。つま先立ちをしたり、ジャンプしたりする時に使われ、ふくらはぎの「盛り上がり」や「高さ」を決めます。
- ヒラメ筋: 腓腹筋の深層にある、平たい形をした筋肉。主に立った姿勢を維持するなど、持久力に関わる働きをします。この筋肉が引き締まることで、足首周りのシャープさが生まれます。
理想的なふくらはぎは、この2つの筋肉がバランス良く発達している状態です。しかし、多くの場合、日常生活の癖によって一方の筋肉ばかりが使われ、アンバランスが生じています。例えば、ヒールをよく履く方は腓腹筋が過剰に発達しやすく、逆に運動不足の方はヒラメ筋が衰えて足首が太く見えがちです。この筋肉の不協和音こそが、ふくらはぎの形が崩れる大きな原因なのです。
原因2:「むくみ」という名の停滞 – 第二の心臓の機能不全
「夕方になると脚がパンパンになる」という方は、「むくみ」が原因でふくらはぎが太く見えています。ふくらはぎは「第二の心臓」と呼ばれているのをご存知でしょうか?
心臓から送り出された血液は、重力に逆らって再び心臓へ戻る必要があります。その際、ふくらはぎの筋肉がポンプのように収縮し、血液を力強く押し上げる手助けをしています。しかし、長時間のデスクワークや立ち仕事で筋肉が凝り固まったり、運動不足で筋力が低下したりすると、このポンプ機能がうまく働きません。結果として、余分な水分や老廃物が脚に溜まり、むくみとなって現れるのです。この状態が慢性化すると、セルライトの原因にもなり、脚のラインをさらに崩してしまいます。
原因3:日々の無意識な「悪い癖」 – 間違った歩き方と姿勢
意外と見過ごされがちなのが、毎日の歩き方や姿勢の癖です。例えば、以下のような習慣はありませんか?
- すり足歩き: 足の指をほとんど使わず、ペタペタと歩く癖。
- 外側重心: 靴底の外側ばかりがすり減る。
- 猫背: 重心が前に傾き、バランスを取るためにふくらはぎの外側に余計な負担がかかる。
これらの悪い癖は、ふくらはぎの特定の筋肉だけを過剰に使い、不自然な発達を促してしまいます。特に、ふくらはぎの外側が張り出して太く見える「ししゃも脚」と呼ばれる状態は、間違った歩き方が原因であることが非常に多いのです。トレーニングで筋肉を整えることと同時に、日常の動作を見直すことが、美脚への本質的なアプローチと言えるでしょう。
【解剖学】理想の”逆ハート型”ふくらはぎを創る筋肉の仕組み
原因がわかったところで、次は「どうすれば理想の形になれるのか」という解決策に焦点を当てていきましょう。ただやみくもに鍛えるのではなく、どの筋肉にどうアプローチすれば、あの誰もが憧れる「逆ハート型」のふくらはぎが手に入るのか。そのメカニズムを詳しく解説します。
「高さ」と「立体感」を生み出す『腓腹筋』
ふくらはぎの「高い位置での盛り上がり」、つまり理想のふくらはぎのシルエットを決定づけるのが腓腹筋です。この腓腹筋は、実は「内側頭(ないそくとう)」と「外側頭(がいそくとう)」という2つの頭に分かれています。
- 内側頭: ふくらはぎの内側の盛り上がりを作る。
- 外側頭: ふくらはぎの外側の盛り上がりを作る。
この内外の筋肉をバランス良く鍛えることで、上部でキュッとまとまり、下に向かってスッと細くなる、美しい逆ハート型の立体感が生まれます。多くの方は、歩き方の癖などで外側頭ばかりが発達し、内側頭が弱い傾向にあります。そのため、意識的に内側頭を刺激するトレーニングが、美脚創りの鍵を握っているのです。
「引き締まった足首」を演出する『ヒラメ筋』
一方で、足首付近の引き締め感を担当するのがヒラメ筋です。この筋肉は、腓腹筋の下に隠れていますが、アキレス腱へと繋がる重要な筋肉です。
ヒラメ筋を鍛えることで、足首周りが安定し、キュッと引き締まった印象を与えます。腓腹筋のような派手な盛り上がりはありませんが、この筋肉がしっかりしているかどうかが、脚全体のメリハリを左右すると言っても過言ではありません。ヒラメ筋は、膝を曲げた状態でのトレーニングでより効果的に刺激することができます。
つまり、「腓腹筋で高さと形を作り、ヒラメ筋で足首を締める」。この2つの筋肉への的確なアプローチこそが、理想のふくらはぎへの最短ルートなのです。
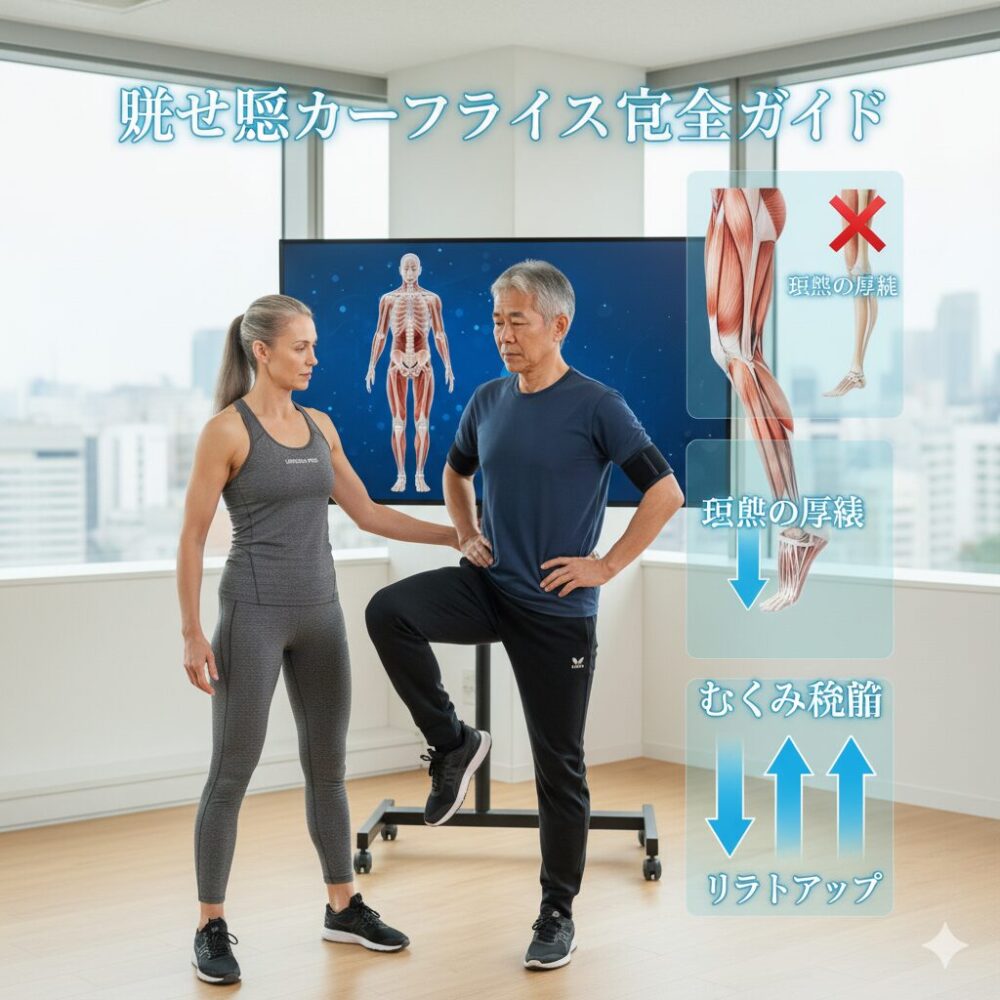
【完全実践マニュアル】これがプロの「ハの字カーフレイズ」だ!
お待たせしました。ここからは、いよいよ実践編です。これまで解説してきた腓腹筋(特に内側頭)とヒラメ筋を効率よく、かつバランス良く鍛えることができる究極のエクササイズ、**「ハの字カーフレイズ」**を徹底的に解説します。私がHearts227でお客様に指導している内容そのものです。一つ一つの動作の意味を理解しながら、正しいフォームをマスターしていきましょう。
なぜ「ハの字」なのか?その科学的根拠
通常のカーフレイズ(つま先をまっすぐ前に向ける方法)でもふくらはぎは鍛えられますが、より美しい形を目指すなら「ハの字」が圧倒的におすすめです。
つま先を外側に開いて「ハの字」を作ることで、股関節がわずかに外旋(外に捻られる)します。この体勢でかかとを上げると、身体の構造上、ふくらはぎの内側にある腓腹筋内側頭への刺激が格段に高まります。 前述の通り、多くの方は内側頭が弱いため、ここを集中的に鍛えることで、内外の筋肉バランスが整い、理想の逆ハート型に近づくことができるのです。これは解剖学に基づいた、非常に合理的なテクニックです。
基本フォーム:一回一回に魂を込める
回数をこなすことよりも、まずは正しいフォームで1回を完璧に行うことが重要です。鏡の前でご自身の姿を確認しながら、ゆっくりと行いましょう。
【準備姿勢】
- 足を肩幅程度に開きます。
- つま先を外側に向け、かかと同士を近づけ、足全体で「ハの字」を作ります。角度は45度程度が目安ですが、無理のない範囲で構いません。
- 背筋を伸ばし、お腹(丹田)に軽く力を入れて体幹を安定させます。目線はまっすぐ前へ。
- 両手は腰に当てるか、バランスが取りにくい場合は壁や椅子に軽く手を添えましょう。
【動作】
- 上げる(3秒かけて): 息をゆっくり吐きながら、足の親指の付け根(母指球)で地面を強く押す意識で、かかとをできるだけ高く持ち上げます。この時、ふくらはぎが「キュッ」と収縮するのを感じてください。一番高い位置で1秒間キープします。
- 下ろす(5秒かけて): 息を吸いながら、さらにゆっくりと、5秒ほどかけてかかとを下ろしていきます。重力に任せてストンと落とすのではなく、常にふくらはぎの力でコントロールするのがポイントです。かかとが地面につくギリギリまで下ろしたら、すぐに次の動作に移ります。
【回数とセット数】
- 初心者の方: 15回 × 2セット から始めてみましょう。
- 慣れてきた方: 20回 × 3セット を目標にしましょう。
セット間の休憩は30秒〜1分程度です。回数よりも、ふくらはぎに「効いている」感覚を大切にしてください。
よくある間違い(NGフォーム)と修正法
効果が出ないだけでなく、怪我の原因にもなるNGフォームを知っておくことは非常に重要です。
- NG①:膝が曲がってしまう
- 原因: 楽をしようと、太ももの力を使って体を持ち上げようとしている証拠です。
- 修正法: 膝は常に伸ばしたまま行うことを意識してください。お尻をキュッと締めるようにすると、膝が曲がりにくくなります。
- NG②:体が前後に揺れる・反動を使う
- 原因: 勢いを使って回数をこなそうとしています。これでは筋肉への刺激が半減します。
- 修正法: お腹(丹田)に力を入れ、体幹を一本の棒のように固定します。動作はあくまで「上下動」のみです。
- NG③:足の小指側に体重が乗ってしまう
- 原因: ハの字の意識が薄れ、腓腹筋の外側頭ばかりを使っている状態です。
- 修正法: 常に「親指の付け根(母指球)」で地面を押すことを意識してください。これにより、内側頭へ的確にアプローチできます。
【応用編】効果を120%に引き上げるプロのちょい足しテクニック
基本のカーフレイズをマスターしたら、次はトレーニング効果をさらに高めるための応用テクニックです。少しの工夫で、筋肉への刺激は劇的に変わります。ぜひチャレンジしてみてください。
テクニック1:段差を利用した「フルレンジ・カーフレイズ」
これは本当におすすめです。私自身も必ず取り入れています。雑誌の階段や玄関の段差など、安定した場所を見つけて行いましょう。
【やり方】
- 段差の端に、足の指の付け根あたりまでを乗せます。かかとは段差から完全に出ている状態です。
- 壁などに手を添えて、しっかりとバランスを取ります。
- 基本のカーフレイズと同様に、かかとを高く持ち上げます。
- 下ろす際に、かかとを段差よりも低い位置まで、ふくらはぎが心地よく伸びるのを感じるまで深く下ろします。
【なぜ効果的なのか?】
地面で行うよりも可動域(関節や筋肉が動く範囲)が格段に広がるため、ふくらはぎの筋肉を最大限にストレッチさせ、そして最大限に収縮させることができます。この「伸び縮みの幅」を大きくすることが、筋肥大、つまり筋肉を成長させる上で非常に重要なのです。まさに「自分史上最高に伸びる」感覚を体験できるはずです。
テクニック2:トレーニング後の「静的ストレッチ」で回復を促す
トレーニングで酷使した筋肉は、硬く収縮したままになりがちです。これを放置すると、血行が悪くなり、疲労回復が遅れるだけでなく、筋肉が硬く太くなってしまう原因にも。トレーニング後には必ずストレッチを行い、しなやかな筋肉を育てましょう。
【おすすめストレッチ:アキレス腱伸ばし】
- 壁の前に立ち、両手を壁につきます。
- 片足を大きく後ろに引き、かかとを床につけます。
- 前の足の膝をゆっくり曲げながら、後ろ足のふくらはぎからアキレス腱にかけて、じんわりと伸ばしていきます。
- 「痛気持ちいい」と感じるポイントで、深い呼吸をしながら30秒キープします。
- 反対の足も同様に行います。
テクニック3:丹田を意識し、全身の連動性を高める
これはHearts227ならではの視点です。丹田(たんでん)、つまりおへその下あたりにある身体の中心を意識することで、トレーニングの質は飛躍的に向上します。
カーフレイズを行う際に、ただ足の力だけで上げ下げするのではなく、まず丹田に「グッ」と力を込めてみてください。するとどうでしょう。身体の軸が安定し、余計なブレがなくなり、ふくらはぎの筋肉だけに的確に負荷を乗せることができるようになります。これは、身体の中心から末端へと力を伝える「連動性」が高まるからです。この感覚を掴めると、あらゆるトレーニングの効率がアップします。
むくみは生活習慣で断ち切る!トレーニング効果を倍増させる5つのルール
どれだけ素晴らしいトレーニングをしても、体がむくんでいては台無しです。むくみ知らずのスッキリとした脚は、日々の小さな習慣の積み重ねによって作られます。トレーニングと並行して、以下の5つのルールをぜひ実践してください。
- ルール1:カリウムで余分な塩分を排出する塩分の摂りすぎは、体内に水分を溜め込み、むくみを引き起こす最大の原因です。外食や加工食品が多い方は特に注意が必要です。体内の余分な塩分(ナトリウム)を排出してくれる働きがある「カリウム」を積極的に摂取しましょう。
- カリウムが豊富な食品: バナナ、アボカド、ほうれん草、納豆、海藻類など
- ルール2:「喉が渇く前」に賢く水分補給むくむのが怖いからと水分を控えるのは逆効果です。水分が不足すると、体は危険を察知して逆に水分を溜め込もうとします。1日に1.5〜2リットルを目安に、こまめに水を飲む習慣をつけましょう。一度にがぶ飲みするのではなく、コップ1杯程度を1〜2時間おきに飲むのが理想です。
- ルール3:ぬるめのお湯で「全身の血行」を促進シャワーだけで済ませず、できるだけ湯船に浸かりましょう。38〜40度程度のぬるめのお湯に15分ほど浸かることで、全身の血行が良くなり、リラックス効果も得られます。水圧によるマッサージ効果も期待でき、脚に溜まった老廃物を押し流す助けになります。
- ルール4:寝る前の5分で「セルフリンパマッサージ」お風呂上がりの血行が良いタイミングで行うのが効果的です。ボディクリームやオイルを使い、肌の滑りを良くしてから行いましょう。
- 簡単マッサージ法: 足首から膝裏に向かって、両手で優しく包み込むようにさすり上げます。膝の裏にあるリンパ節に向かって、老廃物を流していくイメージです。これを左右それぞれ10回程度繰り返すだけでも、翌朝のスッキリ感が全く違います。
- ルール5:心臓より高く!「足上げ」で重力から解放就寝前に、仰向けになって脚を壁に立てかける「足上げ」を5〜10分ほど行いましょう。重力によって脚に溜まっていた血液やリンパ液が心臓方向へ戻りやすくなり、むくみやだるさの解消に繋がります。本を読んだり、スマートフォンを見たりしながらでもできる、簡単な習慣です。
まとめ:あなたの脚は、もっと美しくなれる
今回は、ふくらはぎの形と位置を劇的に変えるための、プロの視点からのアプローチを徹底的にお伝えしました。
あなたのふくらはぎの悩みは、単なる体質ではなく、筋肉のアンバランス、むくみ、そして日常の癖という明確な原因によって引き起こされています。 そして、その原因に対する最も効果的な解決策の一つが、腓腹筋とヒラメ筋をバランス良く鍛える**「ハの字カーフレイズ」**なのです。
正しいフォームで行うトレーニングは、裏切りません。最初は筋肉痛があるかもしれませんが、それは筋肉が確かに反応している証拠です。応用テクニックやむくみ解消の生活習慣も取り入れながら、一歩一歩、着実に理想の脚に近づいていきましょう。
「百聞は一見にしかず」ということわざがありますが、トレーニングにおいては**「百見は一動にしかず」**です。この記事を読んで「なるほど」で終わらせるのではなく、ぜひ今日、この瞬間から立ち上がって、まずは10回のハの字カーフレイズを試してみてください。その一歩が、あなたの未来を変える大きな一歩となるはずです。
もし、「一人では正しいフォームがわからない」「もっと自分に合ったトレーニングを知りたい」「加圧トレーニングや丹田にも興味がある」という方がいらっしゃいましたら、ぜひ一度、大阪梅田のHearts227へお越しください。私が、あなたの「変わりたい」という想いに、全力で向き合います。
あなたの脚には、あなたがまだ知らない素晴らしい可能性が眠っています。一緒にその可能性を、最大限に引き出しましょう。
パーソナル加圧トレーニング&丹田(たんでん)波動整体スタジオHearts227-ハーツニニナナ-大阪梅田店
キャンペーン
■体験トレーニング5000円Instagram、公式LINE登録で⇒3000円
■入会金⇒0円
御堂筋線中津駅徒歩1分、
阪急大阪梅田駅茶屋町口徒歩5分、
JR大阪駅徒歩9分
〒531-0072 大阪府大阪市北区豊崎5丁目7−11 アベニュー中津 403号室
営業時間 10:00~22:00
(LAST 21:00)
予約ホーム(https://share.google/G8r7x8Z1hsMsN0vAB)
English Version
[Pro Trainer’s Guide] Want to Reshape Your Calves? The Ultimate Calf Raise Guide to Sculpt Your Dream Legs and Banish Swelling
“Why are my calves so thick and low?”
“My legs get so swollen by the evening that my shoes feel tight…”
“I wish I had toned ankles and high, sculpted calves like a model…”
As a personal trainer at Hearts227, my studio in Umeda, Osaka, I hear these concerns from my clients almost every day. Hello, I’m Toshihisa Tomura.
Many people might have resigned themselves to thinking that the shape of their calves is just due to their “genetics or body type.” But let me be clear: it is absolutely possible to dramatically change the shape and position of your calves with the right knowledge, training, and lifestyle habits.
In this article, I will share everything I’ve learned from years of experience as a trainer and my expert knowledge of body mechanics to guide you toward achieving your “best calves ever.” This isn’t about superficial tricks. This is a comprehensive “owner’s manual for your legs” that addresses the root causes of your concerns and promotes genuine, lasting change.
By the time you finish reading this, you will have gained:
- A deep understanding of the real reasons why your calves may appear thick and sit low.
- A clear answer to which muscles you need to train and how to train them to create理想的な calf shape.
- The correct form for a highly effective exercise, the “Turn-Out Calf Raise,” taught by a pro, which you can start practicing today.
- Lifestyle habits to maximize your training results and eliminate persistent swelling from the source.
You don’t have to struggle with this alone anymore. Let’s take the first step together toward beautiful, confident legs.
Why Your Calves Aren’t a “Perfect Shape”: Uncovering the 3 Root Causes
The shape of our calves is a common concern, and its cause is not singular but a complex interplay of several factors. Let’s start by understanding the enemy. From a professional’s perspective, here is a complete breakdown of the root causes behind your leg troubles.
Cause 1: Muscle Imbalance – The Disharmony of “Gastrocnemius” and “Soleus”
The primary muscles that determine the shape of your calves are the gastrocnemius and the soleus.
- Gastrocnemius: This is the most superficial muscle of the calf, creating the visible “bulge.” It’s used when you stand on your toes or jump, and it defines the “peak” and “height” of the calf.
- Soleus: This is a flat, broad muscle located underneath the gastrocnemius. It’s primarily a postural muscle, crucial for maintaining a standing position and related to endurance. A well-toned soleus creates a sharp, defined look around the ankle.
Ideally shaped calves are the result of these two muscles being developed in a balanced way. However, for many people, daily habits lead to an imbalance where one muscle is overused while the other is neglected. For instance, frequently wearing high heels can lead to an overdeveloped gastrocnemius. Conversely, a sedentary lifestyle can cause the soleus to weaken, making the ankles appear thicker. This muscular disharmony is a major reason why calf shapes become less than ideal.
Cause 2: “Swelling” and Stagnation – Failure of the “Second Heart”
If your legs feel heavy and swollen by the end of the day, “swelling” (or edema) is likely making your calves look larger. Did you know that your calves are often referred to as the “second heart”?
Blood pumped from the heart has to travel back up to the heart against gravity. The calf muscles play a crucial role in this process by acting like a pump; as they contract, they squeeze the veins and push blood upward. However, if these muscles become stiff from prolonged sitting or standing, or if they are weakened by a lack of exercise, this pump mechanism fails to work efficiently. Consequently, excess fluid and waste products pool in the legs, resulting in swelling. When this becomes a chronic condition, it can even contribute to cellulite, further altering the appearance of your legs.
Cause 3: Unconscious “Bad Habits” – Incorrect Walking and Posture
Often overlooked are the habits of our daily movements, such as walking and posture. Do any of these sound familiar?
- Shuffling walk: Walking without properly using your toes, making a “slapping” sound.
- Outer-edge weight distribution: The outer soles of your shoes wear down বেশি quickly.
- Slouching posture: This shifts your center of gravity forward, placing an excessive burden on the outer calf muscles to maintain balance.
These bad habits cause specific parts of the calf muscles to be overused, leading to unnatural development. A common result is what’s known as “bulky calves,” where the outer calf muscle protrudes, and this is very often caused by an improper gait. Therefore, a holistic approach to achieving beautiful legs involves not only targeted training but also correcting these daily movements.
[Anatomy] The Science of Sculpting the Ideal “Inverted Heart” Calves
Now that we understand the causes, let’s focus on the solution: “How can I achieve that ideal shape?” Instead of training blindly, let’s delve into the mechanics of which muscles to target and how to approach them to get those coveted “inverted heart” shaped calves.
The “Gastrocnemius”: Creator of Height and Dimension
The gastrocnemius is the key muscle that creates the “high peak” of the calf, defining its desirable silhouette. This muscle is divided into two heads: the “medial head” and the “lateral head.”
- Medial Head: Forms the bulge on the inner side of the calf.
- Lateral Head: Forms the bulge on the outer side of the calf.
By training these two heads in a balanced manner, you can create a beautiful, three-dimensional shape that is full at the top and tapers elegantly toward the ankle—the “inverted heart.” Most people tend to have an overdeveloped lateral head due to their walking habits, while the medial head is often weaker. Therefore, consciously stimulating the medial head is the key to sculpting beautiful legs.
The “Soleus”: Architect of Toned Ankles
In contrast, the soleus muscle is responsible for the toned, slender appearance of the ankle area. It lies beneath the gastrocnemius and connects to the Achilles tendon.
Strengthening the soleus stabilizes the ankle joint and gives it a tight, defined look. While it doesn’t create a prominent bulge like the gastrocnemius, the condition of this muscle can make or break the overall sharp, contoured look of the lower leg. The soleus is most effectively stimulated with exercises performed with the knees bent.
In summary, the shortest path to your ideal calves is a two-pronged approach: “Use the gastrocnemius to build height and shape, and use the soleus to tighten the ankles.”
[The Complete Practical Manual] Master the Professional “Turn-Out Calf Raise”
The time has come for the practical part. Here, I will provide a thorough guide to the ultimate exercise for efficiently and balancedly training both the gastrocnemius (especially the medial head) and the soleus: the “Turn-Out Calf Raise.” This is the exact method I teach my clients at Hearts227. Let’s master the correct form by understanding the purpose of each movement.
Why “Turn-Out”? The Scientific Rationale
While standard calf raises (with toes pointing straight ahead) are effective, the “turn-out” variation is vastly superior for sculpting a more beautiful shape.
By turning your toes outward to form a “V” shape, your hip joints slightly externally rotate. When you lift your heels in this position, the stimulation on the medial head of the gastrocnemius is significantly increased due to the body’s biomechanics. As mentioned earlier, since many people have a weaker medial head, targeting this area 집중적으로 helps to correct muscle imbalances and bring you closer to the ideal inverted heart shape. This is a highly logical technique based on anatomy.
The Basic Form: Execute Every Rep with Precision
Perfecting one single repetition with correct form is far more important than just getting through a high number of reps. Practice in front of a mirror, focusing on slow, controlled movements.
[Starting Position]
- Stand with your feet about shoulder-width apart.
- Turn your toes outward and bring your heels closer together, creating a “V” or “turn-out” shape with your feet. An angle of about 45 degrees is a good guideline, but don’t force it.
- Lengthen your spine, gently engage your core (your Tanden, or center), and stabilize your torso. Keep your gaze straight ahead.
- Place your hands on your hips, or if you need help with balance, lightly touch a wall or chair.
[The Movement]
- Lift (Take 3 seconds): As you slowly exhale, press firmly into the ground with the balls of your feet, especially focusing on the base of your big toe. Lift your heels as high as possible. Feel the “squeeze” and contraction in your calves. Hold at the very top for one second.
- Lower (Take 5 seconds): As you inhale, lower your heels even more slowly, taking about 5 seconds. The key is to control the descent with your calf muscles, rather than just letting gravity drop your heels. Lower until your heels are just about to touch the ground, then immediately begin the next repetition.
[Reps and Sets]
- For Beginners: Start with 2 sets of 15 repetitions.
- For Intermediates: Aim for 3 sets of 20 repetitions.
Rest for 30 to 60 seconds between sets. Prioritize the feeling of the muscle “working” over the number of reps.
Common Mistakes (Incorrect Form) and How to Fix Them
Knowing what not to do is crucial, as incorrect form not only reduces effectiveness but can also lead to injury.
- Mistake #1: Bending the knees.
- Cause: This is a sign that you are trying to use your thigh muscles to lift your body.
- Correction: Keep your knees straight throughout the entire movement. Squeezing your glutes can help maintain this position.
- Mistake #2: Rocking the body or using momentum.
- Cause: You are trying to use momentum to complete the reps. This cuts the muscle stimulation in half.
- Correction: Engage your core (Tanden) to keep your torso stable like a solid pillar. The movement should only be vertical.
- Mistake #3: Shifting weight to the outer edge of the feet.
- Cause: You are losing the “turn-out” focus and are predominantly using the lateral head of the gastrocnemius.
- Correction: Constantly focus on pressing down through the ball of your big toe. This will ensure you are properly targeting the medial head.
[Advanced Level] Pro-Tips to Boost Your Results by 120%
Once you’ve mastered the basic calf raise, it’s time to incorporate advanced techniques to enhance your results. Small adjustments can dramatically change the stimulus on the muscle. Give these a try.
Technique 1: The “Full-Range Calf Raise” Using a Step
I cannot recommend this enough; it’s a staple in my own routine. Find a stable elevated surface like a step or the edge of a staircase.
[How to do it]
- Stand with the balls of your feet on the edge of the step. Your heels should be completely off the edge.
- Place a hand on a wall for support and balance.
- Lift your heels high, just like the basic calf raise.
- On the way down, lower your heels below the level of the step until you feel a comfortable, deep stretch in your calves.
[Why it’s so effective]
This method significantly increases the range of motion compared to performing the exercise on a flat surface. It allows you to achieve a maximum stretch and a maximum contraction of the calf muscles. Increasing this “stretch-shortening” distance is a critical factor for stimulating muscle growth. You’ll experience a stretch like never before.
Technique 2: Promote Recovery with Post-Workout “Static Stretching”
Muscles that have been worked hard tend to remain in a tight, contracted state. If left this way, it can impair blood flow, slow down recovery, and even cause the muscle to become stiff and bulky. Always finish your workout with stretching to cultivate long, supple muscles.
[Recommended Stretch: Achilles Tendon Stretch]
- Stand facing a wall with your hands on it for support.
- Step one foot back, keeping the heel on the floor.
- Slowly bend your front knee, feeling a gentle stretch through the calf and Achilles tendon of your back leg.
- Hold the stretch at a point where it feels “pleasantly uncomfortable” for 30 seconds while breathing deeply.
- Repeat on the other side.
Technique 3: Focus on Your “Tanden” to Enhance Full-Body Connection
This is a unique perspective from Hearts227. By focusing on your Tanden—your body’s center, located just below your navel—you can dramatically improve the quality of your training.
When performing calf raises, instead of just using your leg strength, first try to “engage” your Tanden. What happens? Your body’s axis stabilizes, eliminating unnecessary wobbling and allowing you to place the load precisely on your calf muscles. This is because you are improving the “kinetic chain”—the flow of power from your center to your extremities. Once you grasp this feeling, the efficiency of all your workouts will improve.
Break the Cycle of Swelling with Lifestyle Changes: 5 Rules to Double Your Training Effect
Even the best training program can be undermined if your body is constantly swollen. Sleek, defined legs free from swelling are built through the accumulation of small, daily habits. Incorporate the following five rules alongside your training.
- Rule 1: Flush Out Excess Salt with PotassiumExcessive salt intake is the number one cause of water retention and swelling. Be especially mindful if you eat out often or consume a lot of processed foods. Actively consume potassium, which helps your body excrete excess sodium.
- Potassium-rich foods: Bananas, avocados, spinach, natto (fermented soybeans), seaweed.
- Rule 2: Hydrate Smartly “Before” You Feel ThirstyAvoiding water because you’re afraid of swelling is counterproductive. When your body is dehydrated, it goes into survival mode and tries to hold on to every drop of water. Aim to drink 1.5 to 2 liters of water throughout the day. It’s best to sip small amounts—like a glass every hour or two—rather than chugging a lot at once.
- Rule 3: Promote Circulation with a Warm BathTry to soak in a bathtub instead of just taking a quick shower. Soaking in warm water (around 38-40°C or 100-104°F) for about 15 minutes improves blood circulation throughout the body and has a relaxing effect. The water pressure also provides a gentle massage, helping to flush out waste products from your legs.
- Rule 4: A 5-Minute “Self-Lymphatic Massage” Before BedThe best time for this is after a bath when your circulation is at its peak. Use body cream or oil to help your hands glide smoothly over your skin.
- Simple Massage Technique: Using both hands, gently stroke upward from your ankles toward the back of your knees. Visualize pushing stagnant fluid toward the lymph nodes located behind your knees. Repeating this about 10 times on each leg can make a huge difference in how your legs feel the next morning.
- Rule 5: Elevate Your Legs Above Your HeartBefore you go to sleep, lie on your back and rest your legs up against a wall for 5-10 minutes. This uses gravity to help the blood and lymphatic fluid that has pooled in your legs flow back toward your heart, relieving swelling and fatigue. It’s an easy habit you can do while reading a book or looking at your phone.
Conclusion: Your Legs Have the Potential to Be More Beautiful
In this comprehensive guide, we’ve explored a professional’s approach to dramatically changing the shape and position of your calves.
Your concerns about your calves are not just due to your “body type,” but are caused by specific, addressable factors: muscle imbalances, swelling, and daily habits. And one of the most effective solutions for these issues is the “Turn-Out Calf Raise,” which masterfully balances the development of the gastrocnemius and soleus muscles.
Training with proper form will never betray you. You might experience some muscle soreness at first, but that is proof that your muscles are responding. As you incorporate the advanced techniques and lifestyle habits for reducing swelling, you will steadily move closer to your ideal legs, one step at a time.
There’s an old saying, “Seeing is believing,” but in the world of fitness, I believe “Doing is achieving.” Don’t just finish this article with an “I see.” I encourage you to stand up right now, this very moment, and try just 10 Turn-Out Calf Raises. That single action could be the giant leap that transforms your future.
Your legs hold a beautiful potential you haven’t even discovered yet. Let’s unlock that potential together.
- 【プロが断言】その下腹、腹筋運動だけでは凹みません!大阪梅田のトレーナーが教える「丹田」を制する究極のお腹痩せ戦略
- 【プロが警鐘】その「食べないダイエット」がデブ体質を加速させる!40代からのリバウンド地獄を断ち切る唯一の方法
関連記事
-
 【保存版】花粉症は「戦い」じゃない。薬に頼らず、身体と心の『声』を聴いて楽になる、元プロボクサー流の春の迎え方
 -
なぜ、食事と睡眠に気をつけても風邪を引くのか?Hearts227流、細胞が目覚める『引き算』の健康哲学
-
【40代の曲がり角】「運動ゼロ」が招く老化の恐怖と、ズボラな私でも変われた「1日5分」の魔法
-
【大阪/パーソナル】心が折れそうな時こそ「体」から変える。「なんとかなる」を口癖にする究極のメソッド
-
「免疫力アップ」の嘘とホント。情報に振り回されず、丹田と加圧で「本物の治癒力」を引き出す方法
-
「治る力」を引き出す魔法は、あなたの内側に。Hearts227が伝えたい、心と体の調和の真実
-
クリスマスと正月太りの科学
-
心と体をリセットする冬至の魔法:丹田と加圧で未来を拓く「一陽来復」の知恵